EclipseのMavenを実行するサンプルです。
このサンプルでは、クラスとjunit4を使用したテストクラスを作成し、EclipseのMavenでコンパイル、テスト、パッケージ(jarファイル)の作成、削除を行います。
| 確認環境 ・Windows 10 ・Java 8 ・Eclipse 4.8 |
目次
Mavenプロジェクトを作成する
Mavenプロジェクトを作成します。
EclipseでMavenプロジェクトを新規作成する(Java)
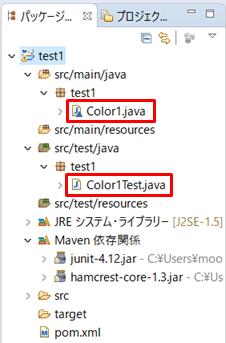
フォルダイメージ
クラスとテストクラスを作成しました。
コードは以下にあります。
Java JUnit4のテストのサンプル
pom.xmlの内容
JUnitでテストするため、6~14行目までを追加しています。
<project xmlns="http://maven.apache.org/POM/4.0.0" xmlns:xsi="http://www.w3.org/2001/XMLSchema-instance" xsi:schemaLocation="http://maven.apache.org/POM/4.0.0 http://maven.apache.org/xsd/maven-4.0.0.xsd">
  <modelVersion>4.0.0</modelVersion>
  <groupId>com.sample1</groupId>
  <artifactId>test1</artifactId>
  <version>0.0.1</version>
<dependencies>
<!-- https://mvnrepository.com/artifact/junit/junit -->
<dependency>
    <groupId>junit</groupId>
    <artifactId>junit</artifactId>
    <version>4.12</version>
    <scope>test</scope>
</dependency>
</dependencies>
</project>
更にpom.xmlを修正する
コンパイルするために更にpom.xmlを修正します。
1.コンパイラのmaven-compiler-pluginを指定します。15~29行目。
https://maven.apache.org/plugins/maven-compiler-plugin/usage.html
2.コンパイラのバージョンを指定します。22~25行目。
https://maven.apache.org/plugins/maven-compiler-plugin/examples/set-compiler-source-and-target.html
3.文字コードのUTF-8を指定します。30~32行目。
http://maven.apache.org/general.html
<project xmlns="http://maven.apache.org/POM/4.0.0" xmlns:xsi="http://www.w3.org/2001/XMLSchema-instance" xsi:schemaLocation="http://maven.apache.org/POM/4.0.0 http://maven.apache.org/xsd/maven-4.0.0.xsd">
  <modelVersion>4.0.0</modelVersion>
  <groupId>com.sample1</groupId>
  <artifactId>test1</artifactId>
  <version>0.0.1</version>
<dependencies>
<!-- https://mvnrepository.com/artifact/junit/junit -->
<dependency>
    <groupId>junit</groupId>
    <artifactId>junit</artifactId>
    <version>4.12</version>
    <scope>test</scope>
</dependency>
</dependencies>
  <build>
    <pluginManagement>
      <plugins>
        <plugin>
          <groupId>org.apache.maven.plugins</groupId>
          <artifactId>maven-compiler-plugin</artifactId>
          <version>3.8.0</version>
        <configuration>
          <source>1.8</source>
          <target>1.8</target>
        </configuration>
        </plugin>
      </plugins>
    </pluginManagement>
  </build>
  <properties>
    <project.build.sourceEncoding>UTF-8</project.build.sourceEncoding>
  </properties>
</project>
Maven compileを実行する
Maven compileを実行するとコンパイルを行うことができます。
1.プロジェクトを右クリックして「実行」→「Mavenビルド...」をクリックします。
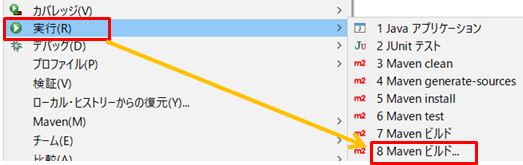
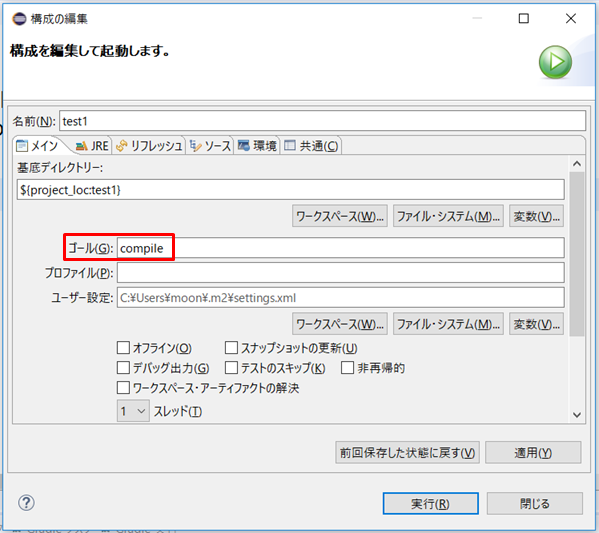
2.「ゴール」にcompileと入力し、実行ボタンを押します。
3.コンパイルが完了するとコンソールにBUILD SUCCESSと表示されます。

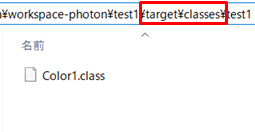
4.コンパイルされたクラスファイルは、プロジェクトフォルダ配下の→targetフォルダ→classesフォルダ→パッケージのフォルダに生成されます。
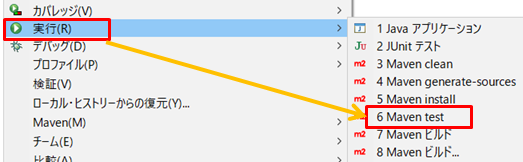
Maven testを実行する
Maven testを実行するとテストを行うことができます。
1.プロジェクトを右クリックして「実行」→「Maven test」をクリックします。
2.テスト完了後、「surefire-reports」フォルダ配下に結果が作成されます。
(反映されないときはプロジェクトを右クリックしてリフレッシュを押して下さい。)
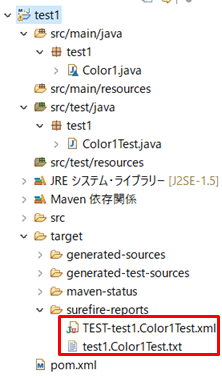
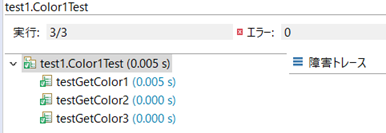
3.test1.Color1Test.txtです。3つのテストがあり全て成功しています。

4.TEST-test1.Color1Test.xmlです。全て成功しています。
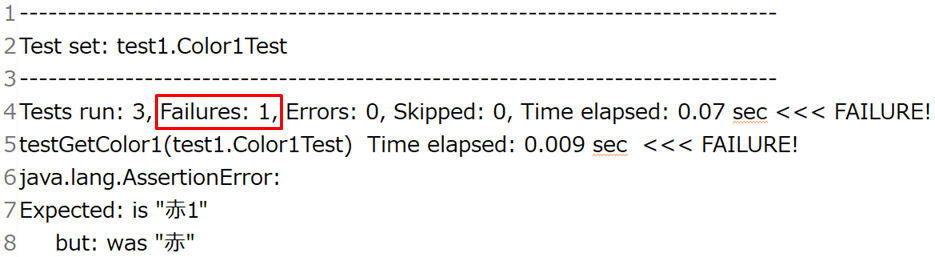
5.テストに失敗したときは、赤枠の箇所のFailures 1というようになります。
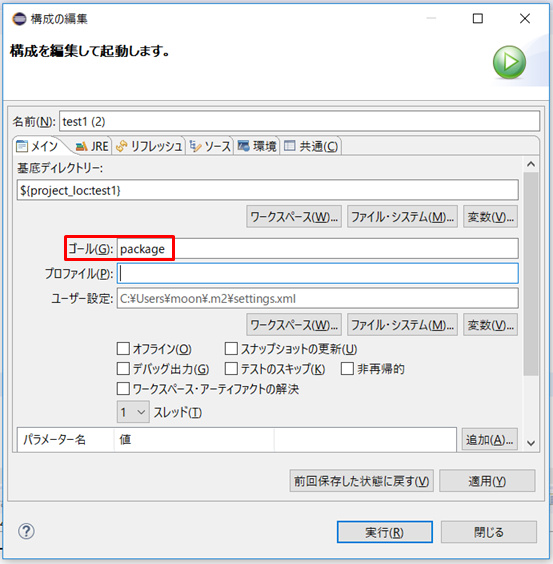
Maven packageを実行する
Maven packageを実行します。
1.プロジェクトを右クリックして「実行」→「Mavenビルド...」をクリックします。
2.「ゴール」にpackageと入力し、実行ボタンを押します。
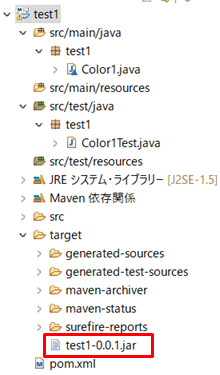
3.targetフォルダ配下にjarファイルが生成されます。
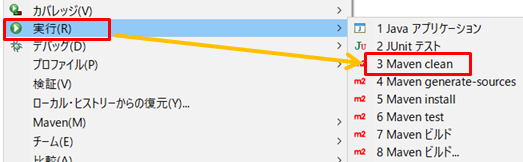
Maven cleanを実行する
Maven cleanを実行します。
1.プロジェクトを右クリックして「実行」→「Maven clean」をクリックします。
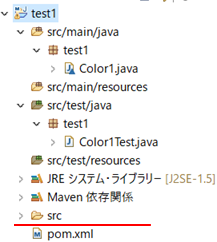
2.targetフォルダ配下が削除されます。
リンク
以下は、Mavenの利用可能なプラグインのリンクです。
https://maven.apache.org/plugins/index.html
関連の記事
EclipseでMavenプロジェクトを新規作成する(Java)
EclipseでJavaプロジェクトからMavenプロジェクトに変換する
EclipseのMavenでjarファイルを取得する(Java)