- ここでは
WindowsOSにおける PHPのインストールについて説明します。また、インストール後の設定変更も合わせて掲載しました。Windowsユーザには、重要な設定となりますので最後までじっくりとお読みください。
- ■
PHPのインストール手順
- 最新の
PHPは、関連サイトから、あなたの環境に合わせて PHPのファイルをダウンロードします。あらかじめ、Cドライブ直下「c:\php」という具合に、「php」という名のフォルダを作成し、その中にダウンロードしてください。
- ダウンロードしたファイルは、そのほとんどが
「ZIP」形式になっていますので、これを解凍しなければなりません。解凍ソフトで ZIPファイルを解凍する場合でも、同じ php というフォルダに展開します。
- 解凍して展開すれば、基本的にはインストールしたことになります。ですが、このままでは、
PHPは動作しません。展開されたファイルの中から幾つかをコピーしたり、設定の書き直しをしなくてはなりません。
- ■ ファイルのコピー
- まず先に、解凍したファイルの中から指定したフォルダにコピーしなくてはなりません。
- ■
php4ts.dllファイルのコピー
- phpフォルダ内から、
「php4ts.dll」という拡張ファイルを、windowsフォルダ内の system32にコピーします。 → 「c:\windows\system32」
Windows95/98/NT の場合は、単に systemフォルダにコピーしてください。- ■
php.ini-distファイルのコピーとファイル名の変更
- 次に、同じく
phpフォルダ内にある「php.ini-dist」というファイルを、windowsフォルダ(WindowsNT/2000/XP の場合は WINNTというフォルダ)にコピーします。
- コピー後、
「php.ini-dist」ファイルの名前を変更します。このファイルを選択し F2キーを押してファイル名を、「php.ini」としてください。
- ファイル名の変更の次は、
「php.ini」に書いてある内容を変更しなければなりません。このファイルの書き直しは慎重に行わなければなりません。万が一を考えて、あらかじめ別の任意のフォルダにコピーしておくことをお勧めします。
- 用意ができたら、「メモ帳」で
「php.ini」ファイルを開きます。
- ■
php.iniファイルの変更
php.iniファイルをメモ帳で開くと次のような設定内容が表示されます。
[PHP]
;;;;;;;;;;;
; WARNING ;
;;;;;;;;;;;
; This is the default settings file for new PHP installations.
; By default, PHP installs itself with a configuration suitable for
; development purposes, and *NOT* for production purposes.
; For several security-oriented considerations that should be taken
; before going online with your site, please consult php.ini-recommended
; and http://php.net/manual/en/security.php.
;;;;;;;;;;;;;;;;;;;
; About this file ;
;;;;;;;;;;;;;;;;;;;
; This file controls many aspects of PHP's behavior. In order for PHP to
; read it, it must be named 'php.ini'. PHP looks for it in the current
; working directory, in the path designated by the environment variable
; PHPRC, and in the path that was defined in compile time (in that order).
; Under Windows, the compile-time path is the Windows directory. The
; path in which the php.ini file is looked for can be overridden using
; the -c argument in command line mode.
〜 以下省略 〜
PHPでは、行の最初にセミコロン「;」をつけると、その行がコメントとして解釈されます。Windows環境で利用するために、このファイルに書かれている内容から、必要な行のセミコロンを外したり、追加をする必要があります。- PageTop
- ■ パスの追加
- 最初に、
「Paths and Directories」と記述されているブロックを探して、以下のように includeファイルへのパスを有効にします。Windowsユーザは必須の項目です。
;;;;;;;;;;;;;;;;;;;;;;;;;
; Paths and Directories ;
;;;;;;;;;;;;;;;;;;;;;;;;;

; UNIX: "/path1:/path2"
;include_path = ".:/php/includes"
;
; Windows: "\path1;\path2"
include_path = ".;c:\php\includes"  ← この行のセミコロンを削除
- PageTop
- ■ Apacheドキュメント・ルートの指定
- 次に、上記リストのすぐ下にある部分を変更します。以下の部分を追記してください。
; The root of the PHP pages, used only if nonempty.
; if PHP was not compiled with FORCE_REDIRECT, you SHOULD set doc_root
; if you are running php as a CGI under any web server (other than IIS)
; see documentation for security issues.  The alternate is to use the
; cgi.force_redirect configuration below
doc_root = "c:/Apache Group/Apache2/htdocs"  ← 下線部分を追記
- PageTop
- ■ 拡張モジュールのディレクトリを指定
- 拡張モジュールのディレクトリを指定します。上記リストのすぐ下にある部分を、以下のように追記してください。
; Directory in which the loadable extensions (modules) reside.
extension_dir = "c:/php/extensions"  ← 下線部分を追記
- PageTop
- ■ 文字列モジュールと GDモジュールの設定
- 最後に、マルチバイト文字列モジュールと、画像を操作するための GDモジュール部分を変更します。
「Dynamic Extensions」というブロックを探して、以下のように変更します。
;;;;;;;;;;;;;;;;;;;;;
; Dynamic Extensions ;
;;;;;;;;;;;;;;;;;;;;;;
;
; If you wish to have an extension loaded automatically, use the following
; syntax:
;
; extension=modulename.extension
〜 中略 〜
;extension=php_fdf.dll
;extension=php_filepro.dll
extension=php_gd2.dll ← この行のセミコロンを削除
〜 中略 〜
;extension=php_java.dll
;extension=php_ldap.dll
extension=php_mbstring.dll ← この行のセミコロンを削除
- これで
php.iniファイルの設定変更が終わりました。「上書き保存」でファイルを保存して閉じます。
- PageTop
- ■
httpd.confファイルの設定
- Windows上にインストールした
Apacheで PHPを動かすために、Apacheにある設定ファイルを幾つか変更しなくてはなりません。少し大変ですが落ち着い、て正確にしっかりと設定してください。これが上手くいかないと PHPを動かすことができません。
- Cドライブ上の
「Apache Group」というフォルダから、Apache2 → conf とフォルダを辿って「httpd.conf」ファイルを選択します。(c:\Apache group\Apache2\conf\httpd.conf)
- このファイルも「メモ帳」で開いてください。このように記載されているはずです。
-
#
# Based upon the NCSA server configuration files originally by Rob McCool.
#
# This is the main Apache server configuration file. It contains the
# configuration directives that give the server its instructions.
# See <URL:http://httpd.apache.org/docs-2.0/> for detailed information about
# the directives.
#
# Do NOT simply read the instructions in here without understanding
# what they do. They're here only as hints or reminders. If you are
# unsure consult the online docs. You have been warned.
#
# The configuration directives are grouped into three basic sections:
〜 以下省略 〜
- PageTop
- ■ 実行ファイルの変更
PHPの実行ファイルを設定します。これが働かないと Windowsでは動いてくれません。「Synamic Shared Object (DSO) Suppor」と書いてある行を探し出します。それを以下のように追記します。先頭にハッシュマーク「#」は要りません。-
# Dynamic Shared Object (DSO) Support
#
# To be able to use the functionality of a module which was built as a
# DSO you have to place corresponding `LoadModule' lines at this
# location so the
〜 中略 〜
# Example:
# LoadModule foo_module modules/mod_foo.so
#
LoadModule access_module modules/mod_access.so
LoadModule actions_module modules/mod_actions.so
〜 中略 〜
#LoadModule vhost_alias_module modules/mod_vhost_alias.so
#LoadModule ssl_module modules/mod_ssl.so
LoadModule php4_module c:/php/sapi/php4apache2.dll ← この1行を追記
- PageTop
- ■ トップページでも PHPが使えるように設定する
- サイトのトップページや、各ディレクトリの
index文書も PHPが利用できるように、ディレクトリ・インデックス「DirectoryIndex」を追記します。以下の部分を探して変更してください。
# DirectoryIndex: sets the file that Apache will serve if a directory
# is requested.
#
# The index.html.var file (a type-map) is used to deliver content-
# negotiated documents.  The MultiViews Option can be used for the
# same purpose, but it is much slower.
#
DirectoryIndex index.html index.html.var index.php
             この部分を追記する ↑
- PageTop
- ■ 文字符号コードの変更
Apacheのデフォルトの文字コードは、ISO-8859-1 になっています。ここでは日本語を使うので、Shift_Jis、EUC-JP などに変更しておく必要があります。「AddDefaultCharset」を以下のように変更します。探すのが大変ですが、1行ずつじっくりとスクロールして探してください。-
#
# Specify a default charset for all pages sent out. This is
# always a good idea and opens the door for future internationalisation
# of your web site, should you ever want it. Specifying it as
# a default does little harm; as the standard dictates that a page
# is in iso-8859-1 (latin1) unless specified otherwise i.e. you
# are merely stating the obvious. There are also some security
# reasons in browsers, related to javascript and URL parsing
# which encourage you to always set a default char set.
#
AddDefaultCharset shift_jis ← ISO-8859-1 を Shift_Jis に変更
- PageTop
- ■ 言語コードの優先順位
Apacheのデフォルトの言語コードの優先順位は、en (英語) が一番になっており、日本語 ja はずいぶん後ろにあります。これをカット&ペーストで順位を入れ替えます。
# LanguagePriority allows you to give precedence to some languages
# in case of a tie during content negotiation.
#
# Just list the languages in decreasing order of preference. We have
# more or less alphabetized them here. You probably want to change this.
#
LanguagePriority ja en ca cs da de el eo es et fr he hr it ko
                  ↑ このように ja を一番先頭に移動する
- PageTop
- ■ MIMEタイプの追加
- 最後に、
Apacheサーバが PHPを解釈できるように、MIMEタイプを追加します。ファイルの最後の方で、以下のように追記してください。
# AddType allows you to add to or override the MIME configuration
# file mime.types for specific file types.
#
#AddType application/x-tar .tgz
Addtype image/x-icon .ico
Addtype application/x-httpd-php .php     ← この1行を追記する
Addtype application/x-httpd-php-source .phps ← この1行も追記する
- これで、
Apacheの、httpd.confファイルの設定が終わりました。ご苦労様です。さっそく「上書き保存」でファイルを保存します。コンピュータを再起動することで、Windows上で PHPを動作させることができます。
- ■ PHP動作の確認
- コンピュータの再起動後、実際に
PHPが動作するかを確認します。非常に簡単なスクリプトで、PHPの情報を得ることができますので、「メモ帳」から以下のようにタイプしてください。
-
  <?php
     phpinfo();
  ?>
- 簡単なのですぐに作れるでしょう。これを
「test.php」というように、ファイル名と拡張子をつけて、Apache Groupフォルダの Apach2フォルダ内にある htdocsフォルダに保存します。
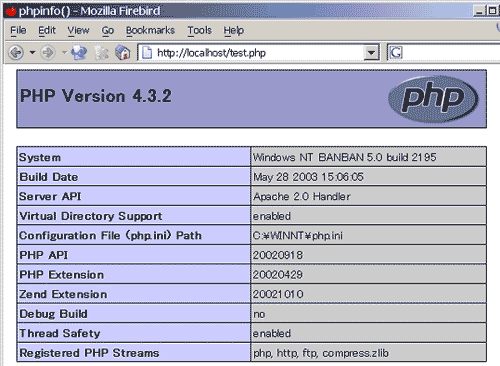
- 保存後、いつも利用している Webブラウザを起動して、その
URL欄に、「http://localhost/test.php」とタイプして、Enterキーを押してください。以下のような画面が出れば、PHPのインストールが成功した証拠になります。
-